Follow Me!

Like what you read? Subscribe/Follow me to make sure that you do not miss out on any new posts :)

29 January 2016

Busy Bag - Seeing Doubles :) + GIVEAWAY!!!

Another very easy to make and a colorful & fun game :)
 
Seeing Doubles - to allow the child to recognize, identify that certain items are the same and are able to group them together. This fine tune their observation skills, recognition of patterns and shapes.
 
What you need:
1) Stickers that comes in duplicates
2) A4 paper, laminated
3) Velcro dots
 
I first created a template in my computer for a table that allows placement of 10 items, 5 in each column. Next will be to select your stickers. As my child is almost three, he is able to distinguish more subtle and subdued colors and patterns. I thus choose more complicated and colorful designs such as the skating shoes and donuts shown below. I made sure that I have 2 of each designs.
 
I place one of each designs onto one column. This is how it will look like...


This then goes through my laminator so that it will be more durable and most importantly - waterproof! Once it goes through the laminator, you can affix the Velcro dots on the other column as shown above.
 
 
I then put through the other half of the duplicate stickers into the laminator and cut them out. I tend to leave a rather big margin so that the kids can handle it easier. You can see how it will look like...


I then affix the other side of the Velcro dots onto the back side of these cut out laminated stickers.


This will be how they look like from the front :)


Lo & behold, you are done!


Even though the items can be small, storage is still relatively easy for these loose pieces as I just Velcro them back onto the paper and pop them back into the bag. Another way will be to use a small ziplock bag to hold these small pieces.
 
To step up this game, I will use solid colors first and build up from there. At this point, you can try to teach recognition of colors too. Stickers can sometimes be hard to find. I get these from a webstore at Love Stick It. They are inexpensive with many pieces in one sheet which is perfect for what I use it for :)
 
When I play with my child, I will step up the game by taking turns to put the items back correctly. For young toddlers, this exposes them to turn-taking and patience. By doing so, I also step up another way when I purposely put the item wrongly and ask my child to correct it :)
 
Besides skating shoes and donuts, there can be many different ideas or items to use. I usually select items that my child can recognize which makes it a lot easier and more "relevant" to the child. You can find lots of other such stickers in the form of cupcakes, ice-cream, dinosaurs, vehicles etc at Love Stick It.


And to encourage you to make one of your own, Love Stick It is giving away 2 sets of such stickers to my readers! You will get to choose either a cupcake themed sticker or a dinosaur themed sticker! To enter this giveaway, just need to LIKE Love Stick it at their Facebook page or follow Love Stick it on their Instagram. Links as below:
 
Love Stick It Facebook - https://www.facebook.com/lovestickit/
 
Love Stick It Instagram - https://www.instagram.com/lovestickit/
 
 
The giveaway will close on 07 February 2016 and the winners will be announced on 10 February 2016. This giveaway is generously open to all my international readers too!
 
I hope that you will give this a try :) Let me know how it goes! Have fun and good luck for the giveaway!
19 January 2016

Busy Bag - Popsicle Fun!

This busy bag is one of my personal favourite :) Not only it is easy to make, it is also lots of fun with many different angles to step up the game :) It can be used by very young toddlers, to pre-K ages which makes it a very lasting and durable game!
This is Busy Bag - Popsicle Fun! As the name suggests, it involves play popsicle and it is so easy to make! What you need are:
1) Colored popsicle (ice-cream) sticks (I found mine in a shop in Bras Basah)
2) Corresponding colored felt pieces (Daiso is good if you only want a small piece for each color)
3) Velcro - adhesive-backed (I bought mine online but it can be found in Daiso as well)
This makes for the basic bag and as your child progresses, you can easily step up the game by many different ways!
Step 1
Create a template to cut the popsicle shape. I draw freehand on a piece of cardboard and use that as a template to cut my felt pieces. I did both big and small so that I can use that as a teaching tool to differentiate size :) You can then affix the adhesive backed Velcro onto the back of the "popsicles". Depending on your Velcro, you may want to spread a drop of super glue or fabric glue to affix it more firmly as it will be taken off and on over and over again. This is how it will look like...
Step 2
Cut the Velcro into thin strips that can fit onto the popsicle sticks. Affix the Velcro onto the popsicle sticks. I usually use the rough side on the sticks and the fuzzy part on the felt pieces. Again I usually add a drop of super glue, just to be on the safe side especially if I am giving this to a young child as the Velcro pieces can be quite small (and alluring!) to a young child! This is how it will look like...
Step 3
You are actually done making the items (YES!) and next will be to teach your child how to play :)
For very young toddlers, you may want to start off with just teaching him how to stick the "popsicle" to the stick. It can be played as game of him being the ice-cream man :) This helps him learn hand-eye coordination.
For slightly older toddlers, I will start by introducing colors and teach the child to match the same colors together. Another way of stepping up here will be to include flavors of ice-cream for example, yellow = corn/banana, red = red bean, green = peppermint and blue = blueberries etc. I show my child what the actual food item look like, drawing attention to the color on the food and then the color of the "popsicle".  
A more advanced step up will be to introduce the words representing the colors. This then helps in word recognition and color association. I print and laminate the word of the color and flash it to indicate what "flavor" I want my ice-cream to be :)
This is a simple yet interesting game where older siblings can join in as well, buying the "popsicles", indicating flavors and even big or small size! We will play till he is all "sold out" where he will declare loudly "no more!" and proceed to "collect" back the popsicles :) For fun, sometimes the older sibling will pretend to get a tummy ache after eating too many "popsicles" and we all go "orrrrrr...." pointing our fingers :P
Drop me an email if you need help with any of the materials :) I will love to know how it turns out for you too if you decide to trying making it :)
Enjoy and have fun!

PS. I am thinking of making a simple card of objectives for playing and step up(s) of each busy bag. This will be made available as a free printable on my blog. Let me know what do you think of this :) Would you prefer to have a set of instructions for making it as well? Love to see your comments!

13 January 2016

Love Stick It Sticker Subscription Review

Hiya! Victoria here guest blogging on Wah Mommy :) A little about me and myself.
 
I currently reside in Vietnam as my husband is posted here. As a crafter and recently-besotted-planner-girl, I was really quite strapped for any craft materials or planner related items here. I relied heavily on online purchase and tons of Happy Mail from US and Singapore for all my hobby needs *oopsy* wants I mean!  

I was totally psyched when my good friend started a sticker subscription! Needless to say, I was about the first ones to nod my head off for a subscription! It was a complete GODSEND and I REALLY NEED some stickers to spruce up my very very dull and boring planner! So I was more than willing (and honored) when she ask me to do a review on her first kit! *thank you love!*
 
This is my first review, so bear with me :)
 
There were two options for the kit, Jumbo & Dainty. Being so sticker-less *is there such a word?* of course I opted for the Jumbo kit! This kit gives you AT LEAST 15 different sticker sheets and a free gift every month too!

The stickers are all themed and this month's it is "Special Moments" for all the moments in your life! I love stickers of all types, especially more unique ones like puffy, 3D, functional and all! Yea, I am pretty sticker-mad!
 
The sticker sheet that drew my attention immediately were the pearlised heart stickers! These are so dainty and sweet! It works great to denote a special date, anniversary or an extra special moment! Aren't they precious?!


Next are the puffy stickers and there are TWO sheets of different puffy stickers in this kit!!! Stars & Hearts of different colors and designs! These are so flexible and I can see myself using them in my planner, my scrapbook layouts and daily journaling!


If you are using an undated planner like myself, then you will totally love the next sheet of stickers that features the month along with the holiday that it has. For example, February will have a sticker shaped in a heart and with the word "February" on it. Isn't that awesome?!


The next sheet blew me away, for its uniqueness and also the generosity! I get a full sheet of kiss-cut index stickers, fully colored!


Just 2 more sheets to show as I really do not want to spoil the surprise for others! The next two sheets were also amazingly generous if you see them live! And to top it all off, they look fabulous and are functional too! Great choice for the "Special Moments" theme kit I'd say!


Why do I keep saying its so generous? Well this huge kit of 15 different sticker sheets (with a free gift too!) only costs US$10 per month INCLUSIVE of airmail shipping! We all know how atrocious international shipping can costs so this kit is definitely more than value for money!

If you prefer to start with a smaller kit, well there is the Dainty kit giving you at least 8 sheets of stickers and a monthly free gift too! The Dainty kit only costs US$8 per month inclusive of shipping too!

As this kit ships from sunny Singapore, if you live locally or nearby neighboring countries, the costs is even lower!
 
If you just want a try, subscribe away as this is a no commitment kit where u can cancel anytime. The only thing kit owner ask is for you to cancel before the 1st of the month so that she can prep the mails in time :) That is pretty reasonable I think and IMPO, I do not think you will regret your subscription especially the Jumbo kit where each sheet is less than $0.70 (including shipping!) It is truly an amazing kit!
 
After woooing and ahhhing so much, I yet to give you the link to the subscription! Me bad! Here it is!
 
Wah Mommy wants me to let you know too that she will be following up with posts on how differently she uses these stickers and seriously I was pretty floored with how creative she is! Lucky kids she has! 
 
Remember to read this blog for all its creativity! Till my next guest blog! Choose happy ALWAYS!  

08 January 2016

Bitten By Busy Bags Bug (Now That's a Mouthful!)

Busy Bags - a term that I have heard often but never actually paid attention. Partly becos my older kids are too old for it and I hadn't had any reason to make any, well that is till now :P With my littlest now at the age where busy bags are commonly introduced, I find myself going onto Pinterest, Instagram to get inspiration.
 
I find the idea of a busy bag refreshing. Versus a quiet book where there are pages of activities, all put together in a form of a book, it was rather daunting to me. It seem so much more manageable to put together a bag consisting of usually one or two activities rather than a whole book of it! Another plus will be that bringing these out are so much easier than an entire book!
 
I have created quite a number from when I started late last year. I enjoyed doing it and had gifted to some friends with similar aged kids as well. It was fun to make and more fun to change some things around to fit the age or interests :)
 
This post will start off my busy bag journey where I show how I create the different activities and what are the learning points. I had fun doing it and hope that by showing, you will be tempted to give it a try too! It is exceedingly satisfying to see your child playing with "toys" or "activities" that you have created with your own hands! It is more economical as well with a simple toy now easily costing an arm and a leg in the retail shops!
 
Most of these bags can "grow" with the child. Eg. they can be stepped up in terms of expansion of learning by adding something simple or by alternating the way of play. One bag, double or triple "duty" - what's not to like?! :P
 
The first of many bags to come - Color Pegging
 
Things you need:
wooden pegs
(I get mine from Daiso where you can get a bag of 30 for $2)
 
wooden tongue depressors
(I found mine in a store at Bras Basah)
 
colored paper
(Again Daiso will give u many options too)
 
glue / sticky tape


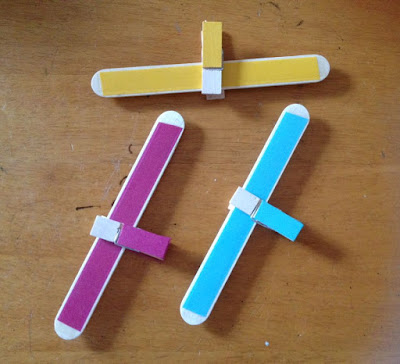
1) Choose the colors that you want your toddler to learn. I started with mainly primary colors. This can be stepped up to include more colors as he masters them. Cut the paper to the width and length of the tongue depressors, fitting them inside with a border. You can then glue/tape the papers to the tongue depressors. I use a wide width sticky tape so that I could sort of "laminate" the papers such that they can last just abit longer :) This is how they will look like:


2) Next will be to cut and glue the same papers to the wooden pegs. I have chosen the slightly shorter but "fatter" wooden pegs so that little fingers can handle them easily. Same logic and this is how they will look like.


3) Believe it or not, you are DONE! Next will be to show your toddler how to work the pegs. I find that my 2 year old had some difficulty initially but he soon learn the how-to :)


3 ways of stepping up...
a) You can introduce more colors, moving from primary to include pastels or the darker colors.
 
b) You can introduce patterns by using papers that has patterns you want to teach. Ideally patterns should be repetitive throughout, making it easily for the toddler to differentiate the different patterns.
 
c) You can introduce the names of the color and/or patterns. By printing/writing the names on a separate sheet of paper, cut them up into little slips and have your toddler match them. Most colors are sight words especially the primary colors like Red, Blue, White etc so this will be a great way for them to pick up some sight words too!
 
 
Learning Points
1) Color Recognition - "duh" I know but it is the main learning point :)
2) Hand Eye Coordination as he tries to work the pegs.
3) Pronunciation of the colors as you call out the colors he matches.
4) Learning of words for colors or patterns.
 
 
If you need help in finding the items used here, do drop me an email and I will definitely help!
 
Have fun!
 
******************************************************************
 
Blog: wahmummy.blogspot.com
 
******************************************************************