Busy Bags - a term that I have heard often but never actually paid attention. Partly becos my older kids are too old for it and I hadn't had any reason to make any, well that is till now :P With my littlest now at the age where busy bags are commonly introduced, I find myself going onto Pinterest, Instagram to get inspiration.
I find the idea of a busy bag refreshing. Versus a quiet book where there are pages of activities, all put together in a form of a book, it was rather daunting to me. It seem so much more manageable to put together a bag consisting of usually one or two activities rather than a whole book of it! Another plus will be that bringing these out are so much easier than an entire book!
I have created quite a number from when I started late last year. I enjoyed doing it and had gifted to some friends with similar aged kids as well. It was fun to make and more fun to change some things around to fit the age or interests :)
This post will start off my busy bag journey where I show how I create the different activities and what are the learning points. I had fun doing it and hope that by showing, you will be tempted to give it a try too! It is exceedingly satisfying to see your child playing with "toys" or "activities" that you have created with your own hands! It is more economical as well with a simple toy now easily costing an arm and a leg in the retail shops!
Most of these bags can "grow" with the child. Eg. they can be stepped up in terms of expansion of learning by adding something simple or by alternating the way of play. One bag, double or triple "duty" - what's not to like?! :P
The first of many bags to come - Color Pegging
Things you need:
wooden pegs
(I get mine from Daiso where you can get a bag of 30 for $2)
wooden tongue depressors
(I found mine in a store at Bras Basah)
colored paper
(Again Daiso will give u many options too)
glue / sticky tape
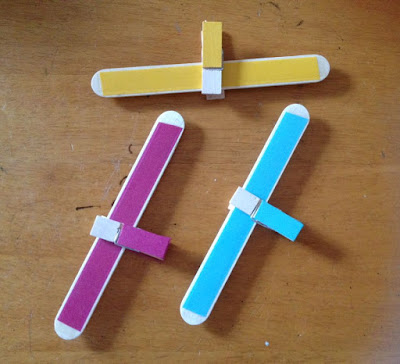
1) Choose the colors that you want your toddler to learn. I started with mainly primary colors. This can be stepped up to include more colors as he masters them. Cut the paper to the width and length of the tongue depressors, fitting them inside with a border. You can then glue/tape the papers to the tongue depressors. I use a wide width sticky tape so that I could sort of "laminate" the papers such that they can last just abit longer :) This is how they will look like:
2) Next will be to cut and glue the same papers to the wooden pegs. I have chosen the slightly shorter but "fatter" wooden pegs so that little fingers can handle them easily. Same logic and this is how they will look like.
3) Believe it or not, you are DONE! Next will be to show your toddler how to work the pegs. I find that my 2 year old had some difficulty initially but he soon learn the how-to :)
3 ways of stepping up...
a) You can introduce more colors, moving from primary to include pastels or the darker colors.
b) You can introduce patterns by using papers that has patterns you want to teach. Ideally patterns should be repetitive throughout, making it easily for the toddler to differentiate the different patterns.
c) You can introduce the names of the color and/or patterns. By printing/writing the names on a separate sheet of paper, cut them up into little slips and have your toddler match them. Most colors are sight words especially the primary colors like Red, Blue, White etc so this will be a great way for them to pick up some sight words too!
Learning Points
1) Color Recognition - "duh" I know but it is the main learning point :)
2) Hand Eye Coordination as he tries to work the pegs.
3) Pronunciation of the colors as you call out the colors he matches.
4) Learning of words for colors or patterns.
If you need help in finding the items used here, do drop me an email and I will definitely help!
Have fun!
******************************************************************
Email: wahmummy@yahoo.com.sg
Blog: wahmummy.blogspot.com
******************************************************************


No comments:
Post a Comment